

The simple knot, also known as the four-in-hand, is one of the easiest knots to tie, while also being a very versatile and elegant choice. If you want to look impeccable, this might be the perfect solution! But how do you tie this knot?

Four-in-hand
The four-in-hand knot is also known as the old German knot or the Italian knot. It is simple to tie and always looks elegant, regardless of the type of tie you pair it with. Where did it originate? Most likely, this knot evolved from one of the nautical knots. As the name suggests, some believe the first to use it were Italians or Germans, but evidence leans more toward the English. Why? In the mid-19th century in England—specifically in London—there was a club called the Four-in-Hand Club, whose members wore nearly identical knots.
Simple knot – tie
If you’re still not convinced about the advantages of this knot, here’s one more: it visually slims the face! Convinced now? Then let’s get started:
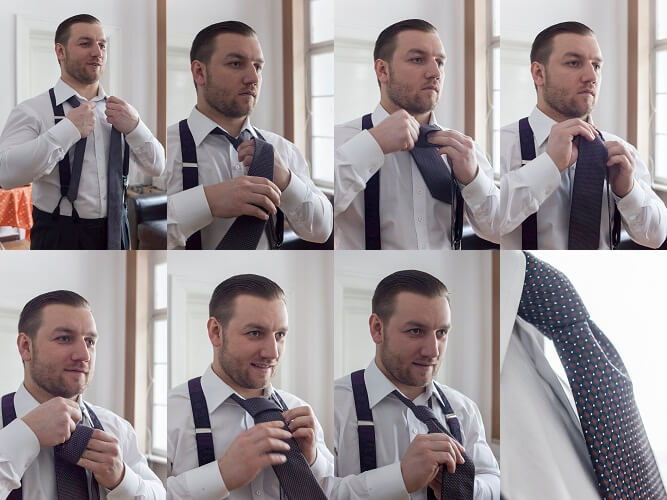
1. Position the narrow end of the tie so that, when held between your fingers, its cross-section resembles the letter C.
2. Position the wider end of the tie so that it runs perpendicular to the axis of the narrower end.
3. Next, flip the tie to the other side. Create the knot’s loop by tightening the lower part slightly, so it wraps around the tie a bit more snugly. Keep holding the “C profile” between your fingers throughout this step.
4. Hold the tie in place and bring the wider end up through the loop of the knot.
5. At this point, you should notice the so-called “dimple” forming just below the knot. You can refine it further! To do this, pinch the tie between your fingers to create a small pleat, so that in cross-section it resembles the letter M.
6. Once you’ve formed both the “C” and “M” shapes, tighten the tie. This will make your dimple look even better. You can refine it further by gently stretching and slightly pushing it out with your thumb to achieve a perfect finish.
7. Finally, pull the sides of the knot to create a defined “waist.” Button up your shirt collar, tighten the tie, and you’re done!
Remember to make sure that no shirt fabric is visible above your tie! That wasn’t so hard, was it? Now all it takes is a little practice!
Comments (1)